初期設定-2になります。設定は初期設定-1同様にTera Termで進めていきます。
初期設定-1はこちらを参照してください。
://take-mystyle.com/centos7/raspberrypi3b/raspbrry-pi3b-centos7-settei-1/
Raspbrry Pi3-CentOS7の初期設定(2)
初期設定-2はCentOS7のアップデートと一般ユーザーでログインできるように一般ユーザーを作成してみます。
まず公開鍵をインストールしておきます。インストールするパッケージの正当性をチェックするためのものです。や
[root@fserver ~]# rpm --import /etc/pki/rpm-gpg/RPM-GPG-KEY-CentOS-7OSを最新にアップデートする
次にOSを最新の状態に保つようにアップデートをしておきます。
[root@fserver ~]# yum -y updateyum アップデートでエラーが出てますね。
[root@fserver ~]# yum -y update
読み込んだプラグイン:fastestmirror
base                                                                         | 3.6 kB  00:00:00
http://mirror.centos.org/altarch/7/kernel/armhfp/kernel-%24kvariant/repodata/repomd.xml: [Errno 14] HTTP Error 404 - Not Found
他のミラーを試します。
To address this issue please refer to the below knowledge base article
https://access.redhat.com/articles/1320623
If above article doesn't help to resolve this issue please create a bug on https//bugs.centos.org/
 One of the configured repositories failed (CentOS Kernels for armhfp),
 and yum doesn't have enough cached data to continue. At this point the only
 safe thing yum can do is fail. There are a few ways to work "fix" this:
     1. Contact the upstream for the repository and get them to fix the problem.
     2. Reconfigure the baseurl/etc. for the repository, to point to a working
        upstream. This is most often useful if you are using a newer
        distribution release than is supported by the repository (and the
        packages for the previous distribution release still work).
     3. Run the command with the repository temporarily disabled
            yum --disablerepo=centos-kernel ...
     4. Disable the repository permanently, so yum won't use it by default. Yum
        will then just ignore the repository until you permanently enable it
        again or use --enablerepo for temporary usage:
            yum-config-manager --disable centos-kernel
        or
            subscription-manager repos --disable=centos-kernel
     5. Configure the failing repository to be skipped, if it is unavailable.
        Note that yum will try to contact the repo. when it runs most commands,
        so will have to try and fail each time (and thus. yum will be be much
        slower). If it is a very temporary problem though, this is often a nice
        compromise:
            yum-config-manager --save --setopt=centos-kernel.skip_if_unavailable=true
failure: repodata/repomd.xml from centos-kernel: [Errno 256] No more mirrors to try.
http://mirror.centos.org/altarch/7/kernel/armhfp/kernel-$kvariant/repodata/repomd.xml: [Errno 14] HTTP Error 404 - Not Found
[root@fserver ~]#
アップデートエラーを検証
Raspbrry Pi3B用のCentOS7は不具合が出てしまうのかアップデートできません。参照するミラーサイトが不明なようなので他のミラーサイトを参照できるように設定を変更してみます。
設定ファイルは /etc/yum.repos.d/CentOS-armhfp-kernel.repo です。
[root@fserver ~]#vi /etc/yum.repos.d/CentOS-armhfp-kernel.repo
[centos-kernel]
name=CentOS Kernels for armhfp
baseurl=http://mirror.centos.org/altarch/7/kernel/$basearch/kernel-$kvariant
enabled=1
gpgcheck=1
gpgkey=file:///etc/pki/rpm-gpg/RPM-GPG-KEY-CentOS-7
       file:///etc/pki/rpm-gpg/RPM-GPG-KEY-CentOS-SIG-AltArch-Arm32
ミラーサイトのURL
< http://mirror.centos.org/altarch/7/kernel/$basearch/kernel-$kvariant >を
< http://mirror.centos.org/altarch/7/kernel/$basearch/kernel-rpi2 >に書き換えます。RaspBerryPi3ですが、rpi3というディレクトリはなくrpi2を参照するみたいなのでこのURLで大丈夫だと思います。
[root@fserver ~]#vi /etc/yum.repos.d/CentOS-armhfp-kernel.repo
[centos-kernel]
name=CentOS Kernels for armhfp
baseurl=http://mirror.centos.org/altarch/7/kernel/$basearch/kernel-rpi2
enabled=1
gpgcheck=1
gpgkey=file:///etc/pki/rpm-gpg/RPM-GPG-KEY-CentOS-7
file:///etc/pki/rpm-gpg/RPM-GPG-KEY-CentOS-SIG-AltArch-Arm32ファイルを変更するには[i]を入力して挿入モードにしてBackSpaceキーで削除、ペーストは[Alt+V]でできます。変更出来たら[Esc]で元に戻して[:wq]で上書き保存ができます。
変更出来たらもう一度アップデートをかけてみます。とりあえずyum clean allをかけておきます。
[root@fserver ~]# yum clean all
読み込んだプラグイン:fastestmirror
リポジトリーを清掃しています: base centos-kernel extras kernel updates
Cleaning up everything
Cleaning up list of fastest mirrors
アップデートしてみましょう。アップデートは時間がかかるので10分程度焦らずに休憩しておきましょう。
[root@fserver ~]# yum -y update
読み込んだプラグイン:fastestmirror
リポジトリーを清掃しています: base centos-kernel extras kernel updates
Cleaning up everything
Cleaning up list of fastest mirrors
[root@centos-rpi3 ~]# yum -y update
読み込んだプラグイン:fastestmirror
base | 3.6 kB 00:00:00
centos-kernel | 2.9 kB 00:00:00
extras | 2.9 kB 00:00:00
kernel | 2.9 kB 00:00:00
updates | 2.9 kB 00:00:00
(1/6): kernel/primary_db | 12 kB 00:00:01
(2/6): updates/7/armhfp/primary_db | 571 kB 00:00:00
(3/6): centos-kernel/armhfp/primary_db | 12 kB 00:00:02
(4/6): extras/7/armhfp/primary_db | 170 kB 00:00:02
(5/6): base/7/armhfp/group_gz | 153 kB 00:00:02
(6/6): base/7/armhfp/primary_db | 4.1 MB 00:00:03
Determining fastest mirrors
依存性の解決をしています
--> トランザクションの確認を実行しています。
---> パッケージ GeoIP.armv7hl 0:1.5.0-11.el7 を 更新
---> パッケージ GeoIP.armv7hl 0:1.5.0-14.el7 を アップデート
--> 依存性の処理をしています: geoipupdate のパッケージ: GeoIP-1.5.0-14.el7.armv7hl
-------------------中略-------------------------
teamd.armv7hl 0:1.29-1.el7
trousers.armv7hl 0:0.3.14-2.el7
tuned.noarch 0:2.11.0-8.el7
tzdata.noarch 0:2020a-1.el7
util-linux.armv7hl 0:2.23.2-63.el7
vim-minimal.armv7hl 2:7.4.629-6.el7
virt-what.armv7hl 0:1.18-4.el7
wpa_supplicant.armv7hl 1:2.6-12.el7
xfsprogs.armv7hl 0:4.5.0-20.el7
yum.noarch 0:3.4.3-167.el7.centos
yum-plugin-fastestmirror.noarch 0:1.1.31-54.el7_8
zlib.armv7hl 0:1.2.7-18.el7
置換:
NetworkManager.armv7hl 1:1.4.0-12.el7 pygobject3-base.armv7hl 0:3.14.0-3.el7
rdma.noarch 0:7.3_4.7_rc2-5.el7
完了しました!
[root@fserver ~]#
CentOSのバージョンを確認
CentOSのバージョンを確認してみます。
バージョンは/etc/redhat-releaseを見ることで確認できます。
[root@fserver ~]# cat /etc/redhat-release
CentOS Linux release 7.8.2003 (AltArch)
[root@fserver ~]#
ユーザー作成
一般ユーザーを作成して最初のログインで一般ユーザーを使います。今のままだと最初からroot権限でログインしてしまうので心配な面もありますから、一般ユーザーでログインして必要な時rootになるようにしましょう。
ユーザーkidを作成してパスワード設定をします。パスワードは確認のため2回入力しますが画面上は表示されません。
[root@fserver ~]# useradd kid
[root@fserver ~]# passwd kid
ユーザー kid のパスワードを変更。
新しいパスワード:
新しいパスワードを再入力してください:
passwd: すべての認証トークンが正しく更新できました。
[root@fserver ~]#
再起動してTera Termで一般ユーザーのkidでログインしてみます。
[root@fserver ~]# shutdown -r now接続が切れてTera Termが終了するので10~20秒後にTera Termを起動してみます。ユーザー名にkidを入力して、パスフレーズに設定したパスワードを入力して[OK]をクリックします。
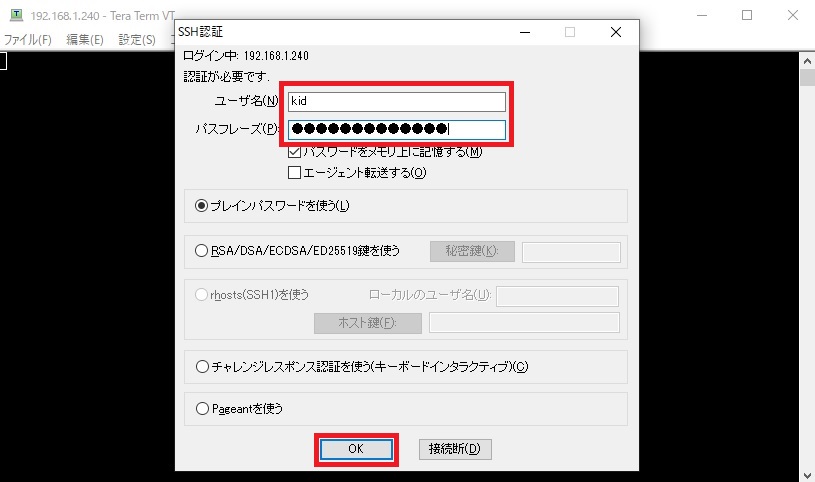
一般ユーザーのkidでログインできました。rootになる場合は[su -]を入力してrootのパスワードを入力してrootになります。入力したパスワードは表示されません。
[kid@fserver ~]$ su -
パスワード:
以上で一般ユーザーでログインしてrootになるところまでできました。
rootでのログインを禁止
一般ユーザーでログインできるようになったのでsshでのrootでのログインを禁止しておきます。
/etc/ssh/sshd_configで設定します。
38行目の
#PermitRootLogin yesの#を削除して、PermitRootLogin noに書き換えます。
設定変更反映のためsshを再起動してTera Termでrootでログインできないのを確認出来たらOKです。
[root@fserver ~]# vi /etc/ssh/sshd_config
---38行目---
#PermitRootLogin yes
       ↓      (yesをnoに変更する)
PermitRootLogin no
[root@fserver ~]# systemctl restart sshd.service
設定変更反映のため再起動してTera Termでrootでログインできないのを確認出来たらOKです。
次回sambaでファイルサーバーを構築する場合はこちらを参考にしてください。
CentOS7の標準エディタはviエディタですが、もっと使いやすいエディタを試すならCentOS7でnanoエディタを使うを参考にしてください。