CentOS7にWindowsから利用できる共有フォルダを作ります。Windowsに共有フォルダを作成できますが、常時稼働していないパソコンに共有フォルダを作成するのは現実的ではありませんよね。
CentOS7を使い、常時稼働サーバーにsambaを構築して共有フォルダとして使えると何かと便利なのでsambaでファイルサーバーを構築してみましょう。
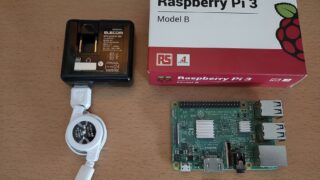
Raspberry Pi3BにCentOSをインストール・初期設定はこちらを参考にしてください。
Raspbrry Pi3BにCentOS7をインストールしてログインまで
Raspbrry Pi3BにCentOS7をインストール後の初期設定(1)
CentOS7がインストールされている状態から進めていきます。
CentOS7のアップデートをしておきましょう。
[root@fserver ~]# yum -y updateSELinuxは有効でも大丈夫
sambaをインストールする前にSELinuxについて確認しておきます。SElinuxを無効にしておくと簡単ですけど、有効のまま構築しても設定をしてあげれば大丈夫です。
SELinuxを無効にする
SELinuxを無効にしておくとスムーズにいくので無効にする手順から説明します。
getenforceで現在の設定を確認します。Enforcingと表示されれば有効になっています。
[root@fserver ~]# getenforce
Enforcing
setenforce 0でOFFになりSELinuxが無効になります。
setenforce 1でONになりSELinuxが有効になります。
[root@fserver ~]# setenforce 0再起動しても無効になるように設定ファイルを書き換えます。
7行目のSELinux=enforcingを無効化してdisabledに書き換えます。
[root@fserver ~]# nano /etc/sysconfig/selinux
# This file controls the state of SELinux on the system.
# SELINUX= can take one of these three values:
#        enforcing - SELinux security policy is enforced.
#        permissive - SELinux prints warnings instead of enforcing.
#        disabled - No SELinux policy is loaded.
#SELINUX=enforcing
SELINUX=disabled
SELinuxが有効のまま設定をする
SELinuxが有効のままの場合はhomeディレクトリにアクセスできるようにSELinuxの設定を変更します。
[root@fserver ~]# setsebool -P samba_enable_home_dirs on SELinuxの設定ができたらsambaのインストールをします。
sambaのインストール・設定
# sambaをインストール
[root@fserver ~]# yum -y install sambasambaユーザー作成とsambaユーザーへ登録
# samba接続用ユーザーをsambatk作成
[root@fserver ~]# useradd sambatk # pdbeditコマンドを使いSambaユーザーとして登録
パスワードを聞かれるので任意にパスワードを入力
入力したパスワードは表示されません。
このsambaユーザーとPASSWORDは共有フォルダの接続時に必要になるので忘れないようにします。
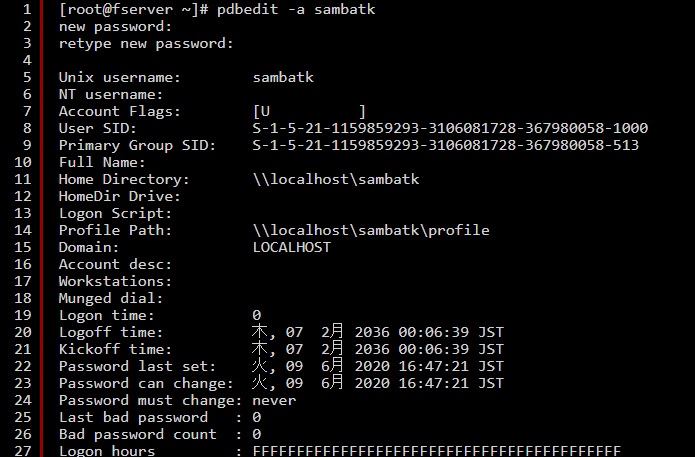
[root@fserver ~]# pdbedit -a sambatk
new password:
retype new password:
Unix username:               sambatk
NT username:
Account Flags:                 [U       ]
User SID:                         S-1-5-21-1159859293-3106081728-367980058-1000
Primary Group SID:         S-1-5-21-1159859293-3106081728-367980058-513
Full Name:
Home Directory:             \localhost\sambatk
HomeDir Drive:
Logon Script:
Profile Path:                    \localhost\sambatk\profile
Domain:                          LOCALHOST
Account desc:
Workstations:
Munged dial:
Logon time:                    0
Logoff time:                   木, 07 2月 2036 00:06:39 JST
Kickoff time:                  木, 07 2月 2036 00:06:39 JST
Password last set:          火, 09 6月 2020 16:47:21 JST
Password can change:   火, 09 6月 2020 16:47:21 JST
Password must change: never
Last bad password       : 0
Bad password count    : 0
Logon hours : FFFFFFFFFFFFFFFFFFFFFFFFFFFFFFFFFFFFFFFFFF
firewalldの設定
[root@fserver ~]# firewall-cmd --permanent --add-service=samba
success
[root@fserver ~]# firewall-cmd --reload
success
sambaの起動と自動起動設定
[root@fserver ~]# systemctl start smb.service
[root@fserver ~]# systemctl start nmb.service
[root@fserver ~]# systemctl enable nmb.service
Created symlink from /etc/systemd/system/multi-user.target.wants/nmb.service to /usr/lib/systemd/system/nmb.service.
[root@fserver ~]# systemctl enable smb.service
Created symlink from /etc/systemd/system/multi-user.target.wants/smb.service to /usr/lib/systemd/system/smb.service.
[root@fserver ~]# systemctl is-enabled smb.service
enabled
[root@fserver ~]# systemctl is-enabled nmb.service
enabled
samba設定ファイルの編集
グローバルエリアに2項目を追加
dos charset = CP932
unix charset = UTF-8
[root@fserver ~]# nano /etc/samba/smb.conf
# See smb.conf.example for a more detailed config file or
# read the smb.conf manpage.
# Run 'testparm' to verify the config is correct after
# you modified it.
[global]
            workgroup = WORKGROUP
            security = user
            dos charset = CP932
            unix charset = UTF-8

            passdb backend = tdbsam

            printing = cups
            printcap name = cups
            load printers = yes
            cups options = raw
# workgroup = WORKGROUP になってることを確認します。(※Windows側で変更していなければ初期状態でなっています。)
testparmコマンドで設定を確認
Press enter to see a dump of your service definitionsの表示のところで[Enterキー]を押します。
[root@fserver ~]# testparm
Load smb config files from /etc/samba/smb.conf
Loaded services file OK.
Server role: ROLE_STANDALONE

Press enter to see a dump of your service definitions
# Global parameters
[global]
            dos charset = CP932
            printcap name = cups
            security = USER
            idmap config * : backend = tdb
            cups options = raw
[homes]
            browseable = No
            comment = Home Directories
            inherit acls = Yes
            read only = No
            valid users = %S %D%w%S
[printers]
            browseable = No
            comment = All Printers
            create mask = 0600
            path = /var/tmp
            printable = Yes
[print$]
           comment = Printer Drivers
           create mask = 0664
           directory mask = 0775
           force group = @printadmin
           path = /var/lib/samba/drivers
           write list = @printadmin root
共有フォルダを作成
共有フォルダとしてhomeディレクトリ内にshareディレクトリを作成します。
# shareディレクトリを作成
[root@fserver ~]# mkdir -p /home/share/
[root@fserver ~]# chmod -R 777 /home/share
# Sambaの設定ファイルの最下行にshareの設定を追記します。
[root@fserver ~]# nano /etc/samba/smb.conf
[share]
           path = /home/share
           browsable = yes
           printable = no
           writable = yes
           guest ok = yes
           force create mode = 777
           force directory mode = 777
それぞれの意味は以下のようになります。
| [share] | Windowsから見た表示名 |
| path = /home/share | shareディレクトリのパス |
| browsable = yes | 共有名の表示をするかしないか |
| printable = no | 印刷可能にするかの設定 |
| writable = yes | 書き込み権限 |
| guest ok = yes | アクセスしてきたユーザーをゲストとして扱う |
| force create mode = 777 | ファイルのパーミッションに強制的に 777 に設定 |
| force directory mode = 777 | ディレクトリのパーミッションに強制的に 777 に設定 |
Sambaの再起動
[root@fserver ~]# systemctl restart smb.service
[root@fserver ~]# systemctl restart nmb.service
Windowsから共有フォルダshareを表示
エクスプローラで¥¥fserver(ご自身のサーバーのホスト名)または¥¥192.168.1.XXX(ご自身のサーバーのIPアドレス)を入力します。
IDとPASSWORDを求められたらsambaユーザー用に作成したsambatkと設定したsambatkのPASSWORDを入力します。

ユーザーsambatkと一緒にshareが作成されました。